Verification Requirements in the Migrated Environment:
It is highly important to have a verification process built in for a migration testing process. By putting out the
The following tests are designed for a hypothetical test case.
Check whether all the data in the legacy is migrated to the new application within the downtime that was planned. To ensure this, compare the number of records between legacy and the new application for each table and views in the database. Also, report the time taken to move say 10000 records.
Check whether all the schema changes (fields and tables added or removed) as per the new system are updated.
Data migrated from the legacy to new application should retain its value and format unless it is not specified to do so. To ensure this, compare data values between legacy and new application’s database.
Test the migrated data against the new application. Here cover a maximum number of possible cases. To ensure 100% coverage with respect to data migration verification, use the automated testing tool.
Check for database security.
Check for data integrity for all possible sample records.
Check and ensure that the earlier supported functionality in the legacy system works as expected in the new system.
Check the data flow within the application which covers most of the components.
The interface between the components should be extensively tested, as the data should not be modified, lost, and corrupted when it is going through components. Integration test cases can be used to verify this.
Check for legacy data redundancy. No legacy data should be duplicated itself during migration
Check for data mismatch cases like data type changed, storing format is changed etc.,
All the field level checks in the legacy application should be covered in the new application as well
Any data addition in the new application should not reflect back on the legacy
Updating legacy application’s data through the new application should be supported. Once updated in the new application, it should not reflect back on the legacy.
Deleting the legacy application’s data in the new application should be supported. Once deleted in the new application, it should not delete data in legacy as well.
Verify that the changes made to the legacy system support the new functionality delivered as a part of the new system.
Verify the users from the legacy system can continue to use both the old functionality and new functionality, especially the ones where the changes are involved. Execute the test cases and the test results stored during the Pre-migration testing.
Create new users on the system and carry out tests to ensure that functionality from the legacy as well as the new application, supports the newly created users and it works fine.
Carry out functionality related tests with a variety of data samples (different age group, users from different region etc.,)
It is also required to verify if ‘Feature Flags’ are enabled for the new features and switching it on/off enables the features to turn on and off.
Performance testing is important to ensure that migration to new system/software has not degraded the performance of the system.
It is also required to carry out Load and stress tests to ensure the system stability.
Verify that the software upgrade has not opened up any security vulnerabilities and hence carry out security testing, especially in the area where changes have been made to the system during migration.
Usability is another aspect which is to be verified, wherein if GUI layout/front-end system has changed or any functionality has changed, what is the Ease of Use that the end user is feeling as compared to the legacy system.
Since the scope of Post-Migration testing becomes large, it is ideal to segregate the important tests that need to be done first to qualify that Migration is successful and then carry out the remaining later.
It is also advisable to automate the end to end functional test cases and other possible test cases so that the testing time can be reduced and the results would be available quickly.
The following is a four part series of educational material to examine in depth the processes of Data Migration, Testing and Automation that are fundamental for any proper operation to take place.
Below is a short summary of the content that will be covered in the 4 part series, followed by part 1.
Reasons and benefits as to why organization will choose Database Migration,
Application can have multiple databases at the backend to support huge customer data
Data enhancement can be achieved
Proper analysis of data will help in improving the data quality
Data sampling & data cleansing helps in keeping the database clean and effective
To carry out data analytics
Examples of Database Migration:
Migration from one RDBMS to another RDBMS
Migration from RDBMS to MongoDB
Upgrading from Informix HC4 to HC6 or HC7
Testing:
Ensuring that the legacy database is not updated during tests after migration.
To ensure the mapping at field and table levels do not change.
Ensuring data is migrated accurately and completely.
Pre-migration and Post-migration testing activities.
Testing Migration in a same type database:
Verify if the queries executed in the new database yield same results as in the older one.
Verify if the number of records in the old database and new database is the same.
Verify that there are no redundancies and new database works exactly as the older one.
Verify if the schema, relationships, table structures are unaltered or set back to match the old database image.
Verify whether the changes made in application updates new database with correct values and type.
Verify if after the new database connection is provided to all the components of the application (Application, server, interfaces, firewall, network connectivity etc.).
Verify the query performance (time-taken to execute complex queries) of the new database is not more than earlier performance.
Automated Testing
Understanding the Cost Benefit analysis of Automated Data Migration Testing.
Challenges of managing the data quantity required to be tested.
Ensuring the quality of the output.
Conclusion
Considering the complexity involved in carrying out data Migration Testing, understanding that even missing a small aspect of of verification will lead to potential failure or damage to valuable data. It is very important to carry out careful and thorough examination and analysis of the system before and after migration. Plan and design the effective migration strategy with the robust tools along with skilled teams.
As we know that Migration has a huge impact on quality of the application, a good amount of effort must be put up by the entire team to verify the entire system in all aspects like functionality, performance, security, usability, availability, reliability, compatibility etc., which in turn will ensure successful ‘Migration Testing’.
Part 1, Overview of Data Migration Testing:
Data migration is the process of selecting, preparing, extracting, and transforming data and permanently transferring it from one computer storage system to another (Wikipedia, 2019). In many organizations data needs to be migrated for a variety of reasons, ranging from newer servers to better applications. But what does this actually mean? In this paper we will look thoroughly in to the process of data migration, and examine what is needed for a successful operation. Data Migration can be cut down to two major processes, the migration, and testing. From the testing point of view, it all means that the application has to be tested thoroughly end-to-end along with migration from the existing system to the new system successfully. Migration Testing is a verification process of migration of the legacy system to the new system with minimal disruption/downtime, with data integrity and no loss of data, while ensuring that all the specified functional and non-functional aspects of the application are met post-migration.
Data Migration Testing Strategy, is an important piece of the operation as it sets out proper parameters of how and when to evaluate the migration to ensure it is running smoothly throughout the entire operation. This is to minimize the errors and risks that occur as a result of migration and to perform the migration testing effectively.
Some Important Activities in Testing:
1) Specialized team formation:
Form the testing team with the members having the required knowledge & experience and provide training related to the system that is being migrated.
2) Business risk analysis, possible errors analysis:
Current & ongoing business operations should not be hampered after migration and hence it is important to carry out ‘Business Risk Analysis’ meetings involving the right stakeholders (Test Manager, Business Analyst, Architects, Product Owners, Business Owner etc.,) to identify the risks and the implementable mitigations. The testing should include scenarios to uncover those risks and verify if proper mitigations have been implemented.
Conduct ‘Possible Error Analysis’ using appropriate ‘Error Guessing Approaches’ and then design tests around these errors to unearth them during testing.
3) Migration scope analysis and identification:
Analyze the clear scope of the migration test as when and what needs to be tested.
4) Identify the appropriate Tool for Migration:
While defining the strategy of this testing, automated or manual, identify the tools that are going to be used. E.g: Automated tool to compare source and destination data.
5) Identify the appropriate Test Environment for Migration:
Identify separate environments for Pre and Post Migration environments to carry out any verification that is required as part of testing. Understand and document the technical aspects of the Legacy and New system of Migration, to ensure that the test environment is set up as per that.
6) Migration Test Specification Document and review:
Prepare Migration Test Specification document which clearly describes the test approach, areas of testing, testing methods (automated, manual), testing methodology (black box, white box testing technique), Number of cycles of testing, schedule of testing, approach of creating data and using live data (sensitive info needs to be masked), test environment specification, testers qualification etc., and run a review session with the stakeholders.
7) Production launch of the migrated system:
Analyze and document the to-do list for production migration and publish it well in advance.
There are two supported implementations for building server-side applications with .NET: .NET Framework and .NET Core. Both share many of the same components and you can share code across the two. However, there are fundamental differences between the two and your choice depends on what you want to accomplish.
Use .NET Core for your server application when: • You have cross-platform needs. • You are targeting microservices. • You are using Docker containers. • You need high-performance and scalable systems. • You need side-by-side .NET versions per application.
Use .NET Framework for your server application when: • Your app currently uses .NET Framework (recommendation is to extend instead of migrating). • Your app uses third-party .NET libraries or NuGet packages not available for .NET Core. • Your app uses .NET technologies that aren’t available for .NET Core. • Your app uses a platform that doesn’t support .NET Core.
Top reasons to choose .NET Core
Cross-platform Needs If your application needs to run on multiple platforms like Windows, Linux, and macOS, use .NET Core; it supports the previously mentioned operating systems as your development workstation. Visual Studio provides an Integrated Development Environment (IDE) for Windows and macOS. You can also use Visual Studio Code, which runs on macOS, Linux, and Windows. Visual Studio Code supports .NET Core, including IntelliSense and debugging. Most third-party editors, such as Sublime, Emacs, and VI, work with .NET Core. These third-party editors get editor IntelliSense using Omnisharp. You can also avoid any code editor and directly use the .NET Core CLI tools, available for all supported platforms.
Need for High-performance and Scalable systems When your system needs the best possible performance and scalability, .NET Core and ASP.NET Core are your best options. High-performance server runtime for Windows Server and Linux makes .NET a top performing web framework on TechEmpower benchmarks.Performance and scalability are especially relevant for microservices architectures, where hundreds of microservices may be running. With ASP.NET Core, systems run with a much lower number of servers/Virtual Machines (VM). The reduced servers/VMs save costs in infrastructure and hosting.
Microservices Architecture Micro services architecture allows a mix of technologies across a service boundary. This technology mix enables a gradual embrace of .NET Core for new microservices that work with other microservices or services. For example, you can mix microservices or services developed with .NET Framework, Java, Ruby, or other monolithic technologies Need for side by side of .NET versions per application level To install applications with dependencies on different versions of .NET, we recommend .NET Core. .NET Core offers side-by-side installation of different versions of the .NET Core runtime on the same machine. This side-by-side installation allows multiple services on the same server, each of them on its own version of .NET Core. It also lowers risks and saves money in application upgrades and IT operations.
Need to use .NET Technologies Not Available for .NET Core Some .NET Framework technologies aren’t available in .NET Core. Some of them might be available in later .NET Core releases. Others don’t apply to the new application patterns targeted by .NET Core and may never be available.
The following list shows the most common technologies not found in .NET Core:
ASP.NET Web Forms applications: • ASP.NET Web Forms are only available in the .NET Framework. • ASP.NET Core cannot be used for ASP.NET Web Forms. • There are no plans to bring ASP.NET Web Forms to .NET Core.
ASP.NET Web Pages applications: • ASP.NET Web Pages aren’t included in ASP.NET Core.
WCF services implementation: Even when there’s a WCF-Client library to consume WCF services from .NET Core, WCF server implementation is currently only available in the .NET Framework. This scenario is not part of the current plan for .NET Core but it’s being considered for the future.
Workflow-related services: Windows Workflow Foundation (WF), Workflow Services (WCF + WF in a single service) and WCF Data Services (formerly known as “ADO.NET Data Services”) are only available in the .NET Framework. There are no plans to bring WF/WCF+WF/WCF Data Services to .NET Core.
Language support: Visual Basic and C# are currently supported in .NET Core, but not for all project types. For a list of supported project templates, see Template options for dot net new.
In addition to the official roadmap, there are other frameworks to be ported to .NET Core. For a full list, see the CoreFX issues marked as port-to-core. This list doesn’t represent a commitment from Microsoft to bring those components to .NET Core. They’re simply capturing the desire from the community to do so. If you care about any of the components marked as port-to-core, participate in the discussions on GitHub. And if you think something is missing, file a new issue in the CoreFX repository (Some References are taken from MSDN).
ASP.NET Core with EF Core and RESTful API ASP.NET Core is an open source, cross-platform framework for building modern internet connected applications, and ASP.NET Core MVC is a middleware which provides a framework for building the APIs and web application using MVC pattern. (Click here to learn more about ASP.NET Core)
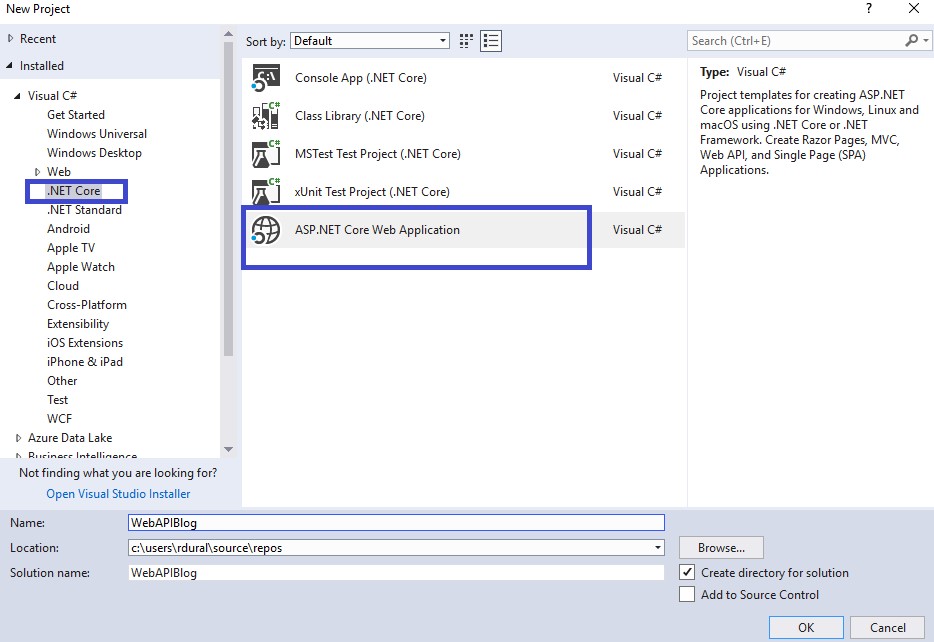
Create an ASP.NET CORE application Open Visual Studio, File -> New ->Project, select ASP.NET Core web application template and click OK
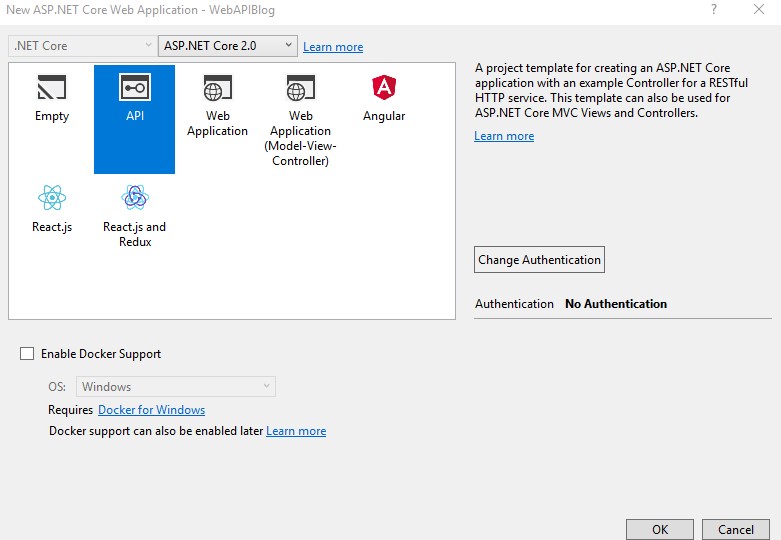
Choose an API template as shown below
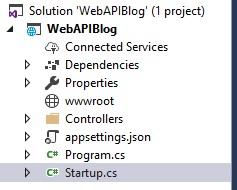
By clicking on OK, it will create a new ASP.NET Core project with some pre-defined configuration files and controller.
The program.cs class which contains the main method with a method called Createwebhostbuilder(), is responsible for running and configuring the application. The host for the application is set up with the startup type as startup class.
The startup.cs class contains two important methods:
ConfigureServices() – it is used to add service to build dependency injection containers and configure those services, Configure() – it is used to configure how the ASP.NET Core application will response to an individual HTTP request.
Configure the Entity Framework Core
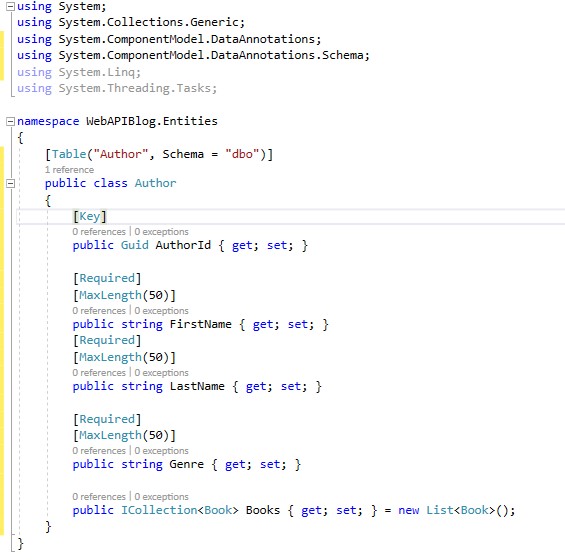
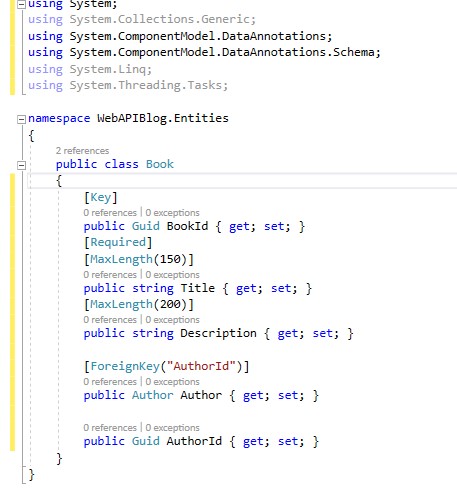
Create a folder called Entities to organize the entity model classes. Let’s create an entity model class.
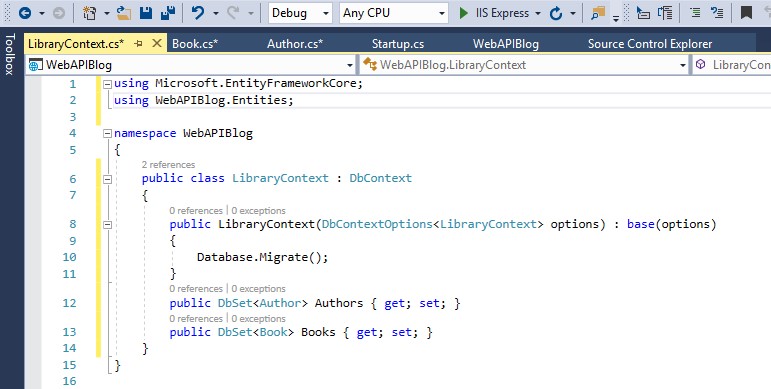
Creating a Context File
Let’s create a context file, add a new class file, and name it as LibraryContext.cs.
Define the database connection in appsettings.json file and let’s register our context in Startup.cs.
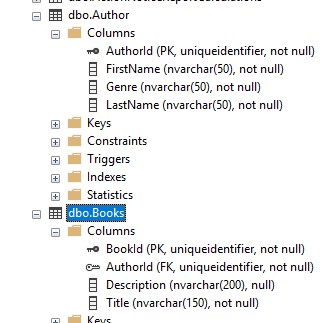
Generate Database from Code-first Approach Run the following command in the Package Manager console. -Add-Migration MyCoreAPIDemo.Entities.LibraryContext
This will create a class for migration. Run the following command to update the database. -Update-database
This will update the database based on our models.
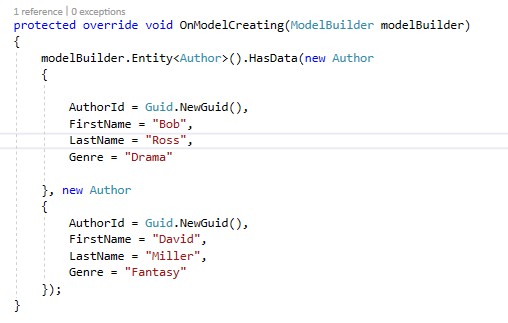
Adding Data Let’s add some data to the Author table. For this, we need to override a method OnModelCreating in the LibraryContext class.
LibraryContext.cs
Let’s run the migration and update command once again.
Creating a Repository Let’s add a repository folder to implement the repository pattern to access the context method.
Create two more folders – Contract and Implementation – under the repository folder.
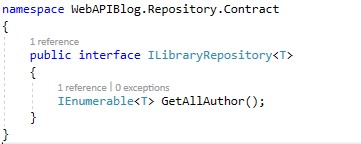
Create an interface ILibraryRepository.cs under Contract folder.
ILibraryRepository.cs
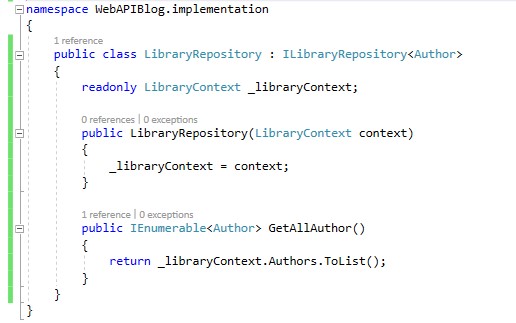
Let’s create a class under implementation folder to implement the function.
LibraryRepository.cs
The above method GetAllAuthor() will return the complete list of records from Author table.
Let’s configure the repository using dependency injection. Open Startup.cs file, add the below code in Configuration Services method.
Create API Controller
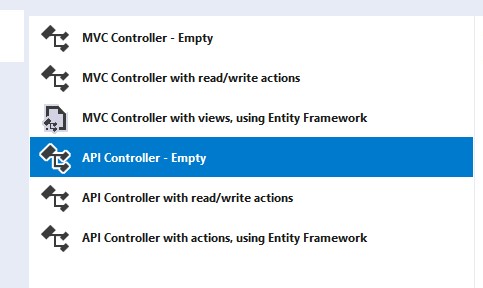
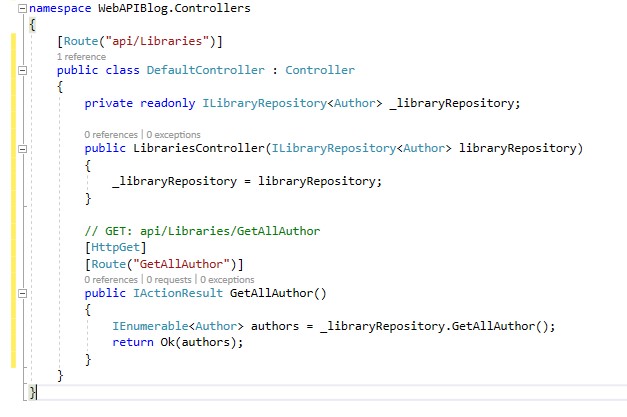
Right-click on controller and go to Add->Controller. Choose an empty API template and name the controller. I named the controller as LibrariesController.
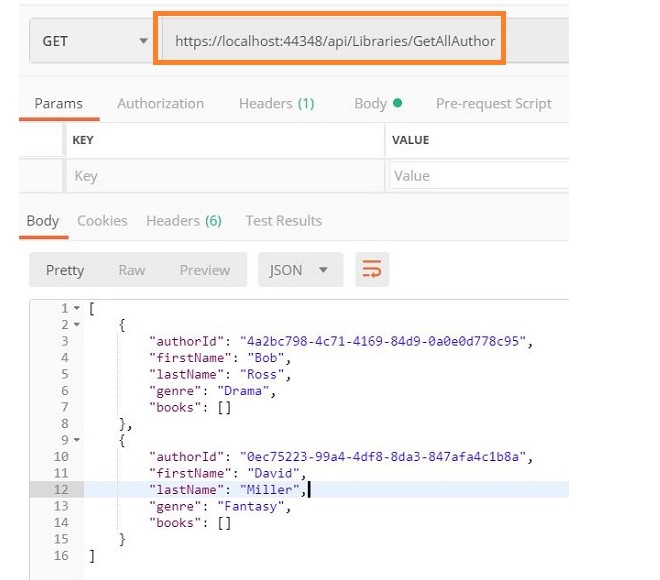
We have created a WEB API with an endpoint api/Libraries/GetAllAuthor to get an author list from the database.
Let’s test the API using Postman tool.
We got an author list as a response.
CREATE using Entity Framework with ASP.Net Core
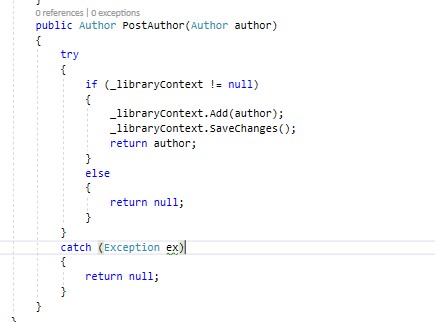
Open the LibraryRepository.cs file from the application and write the below code.
_libraryContext is our database context, the Add method is used to add the records in the entity, and the SaveChanges method is used to save the changes in the database.
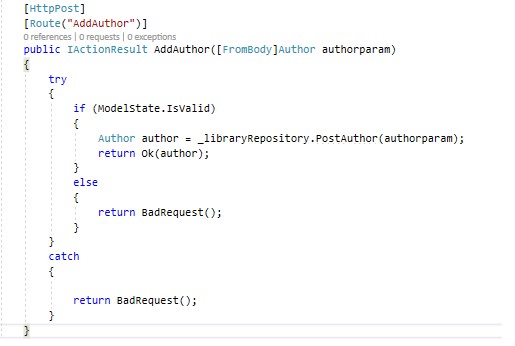
Open LibrariesController.cs file from the application and write this code.
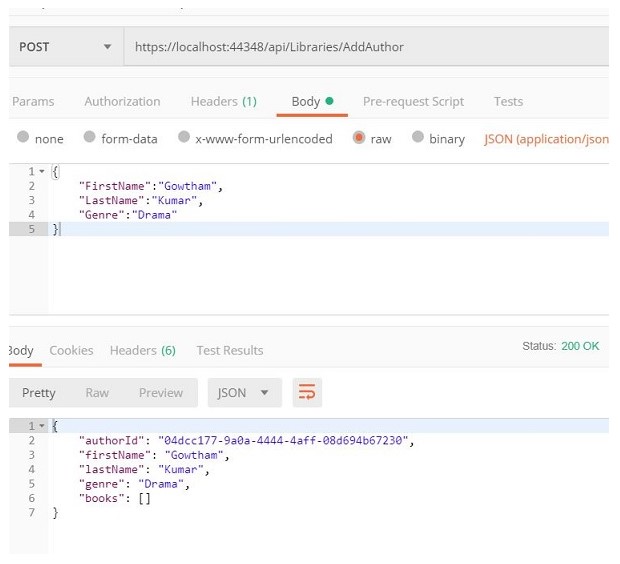
The AddAuthor action will fetch the data from the body of request. Once the modelstate is validated, the data will be added to the database by calling the PostAuthor method in repository.
Let’s test the API in POSTMAN.
From the above image, you can notice that the data is successfully added and returned
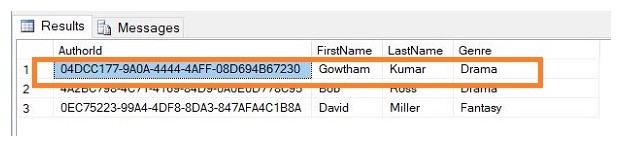
Changes in the database
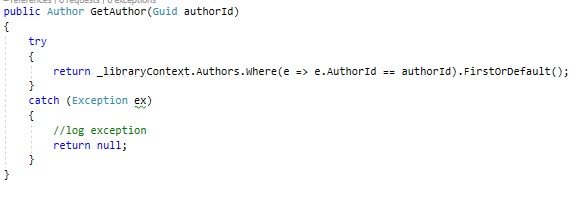
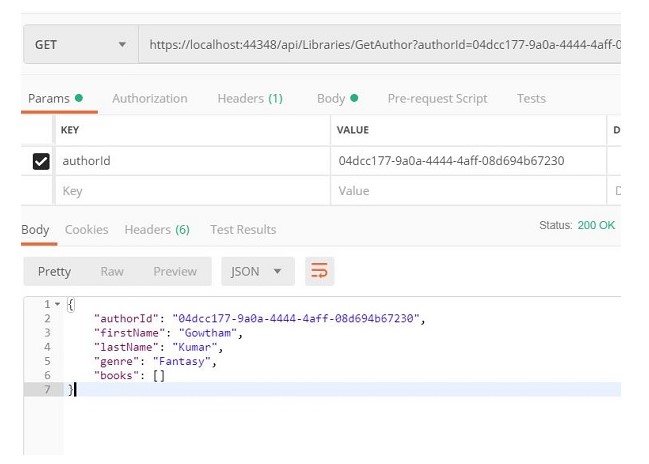
READ We already discussed about GetAllAuthor() read method in my last article. Now, I’m giving a demo of the method which is used to read the data from the database based on Id.
Open the LibraryReporsitory.cs file from the application and write the following code into it.
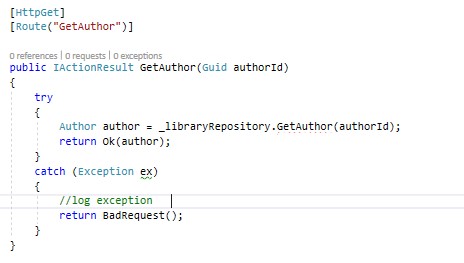
Open the LibrariesController.cs file from the application to add the below code.
Let’s test the API in POSTMAN.
From the above image, you can notice the author data is returned based on the author id.
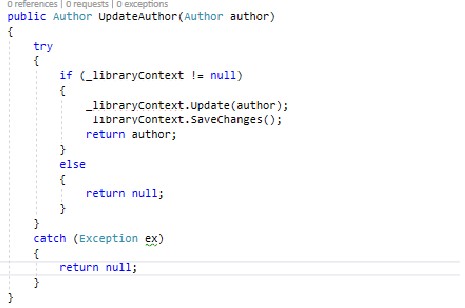
UPDATE Open LibraryRepository.cs file and update it with the given code.
_libraryContext is our database context, the Update method is used to update the records in the entity, and the SaveChanges method is used to save the changes in the database.
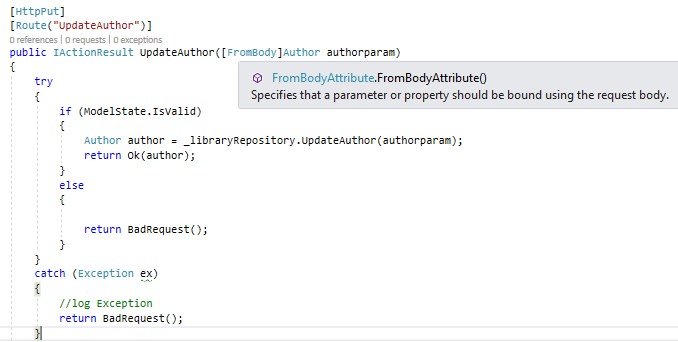
Open LibrariesController.cs file from the application and write the below code.
The UpdateAuthor action will fetch the data from the body of request. Once the modelstate is validated, the data will be updated in database by calling the UpdateAuthor method in the repository.
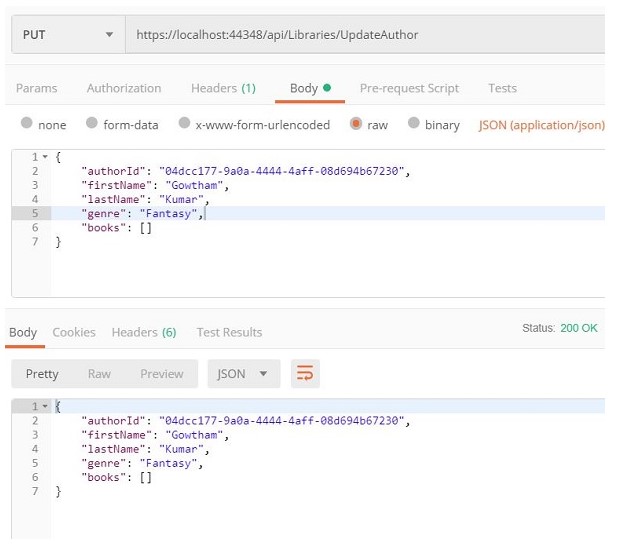
Let’s test the API in POSTMAN.
From the above image, you can notice that the author data is updated based on the request.
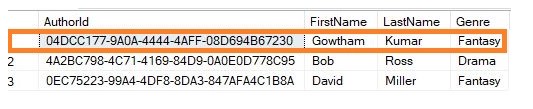
Changes in the Database
DELETE
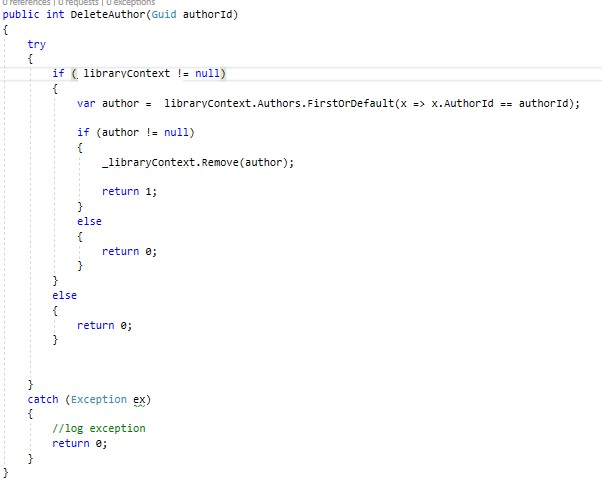
Open the LibraryRepository.cs file from the application and add the following code.
The Remove method is used to remove the records in the entity, the SaveChanges method is used to save the changes in the database based on update done in data entity.
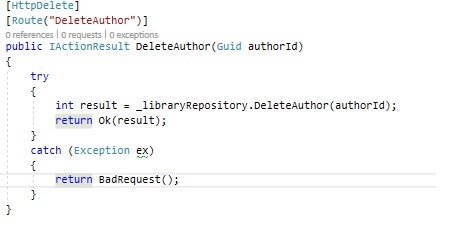
Open LibrariesController.cs file from the application and write this code.
The DeleteAuthor method will delete the record by calling the DeleterAuthor method in the repository based on the author id passed through the request.
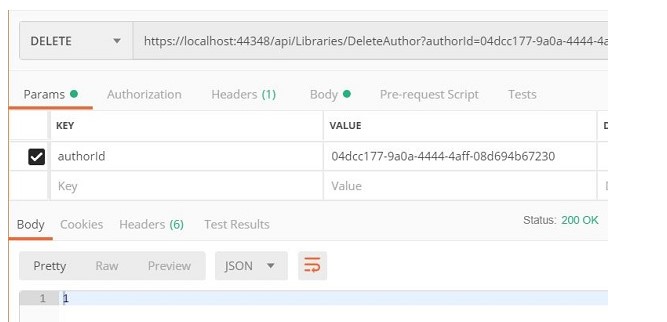
Let’s test the API in POSTMAN.
From the above image, you can notice that we got a response as 1 which means the data is deleted successfully based on the request.
Conclusion
We saw how to create a ASP.NET Core with EF Core and RESTful API . We will see more about ASP.NET Core in future articles.
WEB API 2 is a framework for building HTTP services that can be accessed from any client including browsers and mobile devices. It is an ideal platform for building RESTful applications on the .NET Framework.
HTTP is not just for serving up web pages. HTTP is also a powerful platform for building APIs that expose services and data. HTTP is simple, flexible, and ubiquitous. Almost any platform that you can think of has an HTTP library, so HTTP services can reach a broad range of clients, including browsers, mobile devices, and traditional desktop applications. ASP.NET Web API is a framework for building web APIs on top of the .NET Framework. The following are the return types for Web API action methods.